

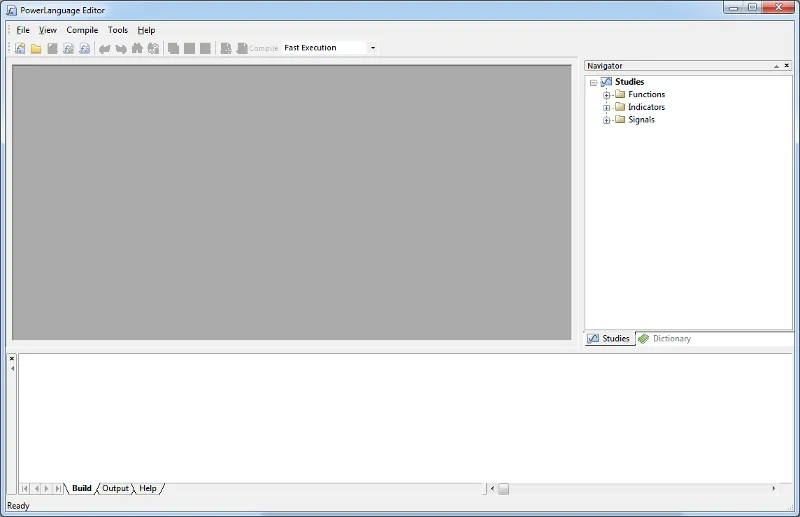
The first steps towards EasyLanguage & PowerLanguage proficiency
Great, you are taking the first step towards learning to program in MultiCharts and TradeStation. I am happy for you, as this will be an interesting journey. If you would like the background on these tutorials first, Lesson 0 explains what they cover and who they are for.
Creating your first study
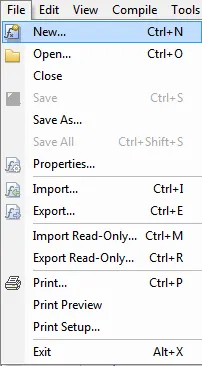
In the PowerLanguage Editor, choose File ▸ New to create a new study.
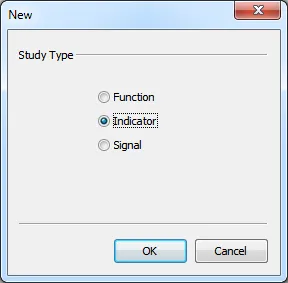
This will bring up a new window. Set the study type to Indicator and click “OK”.
Give the study a name of your choice. The only limitation is that the name can’t be already in use by a different study.
For example, I will use ABC_PowerLanguage Lesson 01 as name and then click OK again. The name will be what you use later to add the study to the chart, so it helps when it displays the purpose of the study.
I like using the ABC_ prefix to label the studies that I have worked on for myself or the website, for example. For other work I will use different labels. This makes it easier to find something when I have to look up a study.
Working with inputs
Every study can have inputs that you can assign a default value to. For example, you can use an input for the length of a moving average. The inputs for indicators and signals can be changed when you load the study on a chart. So it makes sense to have some inputs to allow a more user friendly study.
When you declare an input by giving it a name and initialize it by assigning a default value, you also define the type of the input. There can be three different types:
- a Numeric input
- a String input
- a Boolean input, i.e. a true/false input
To declare an input you use the keyword “Inputs” (or “Input” – they are the same) followed by ”:” and then the input name and the default value in brackets. You can declare several inputs and separate them with a comma. This is how the three different input types could look with a valid name and a default value:
Inputs:
    A_Numeric_Input    (123),
    A_String_Input     ("I am a string"),
    A_Boolean_Input    (true);
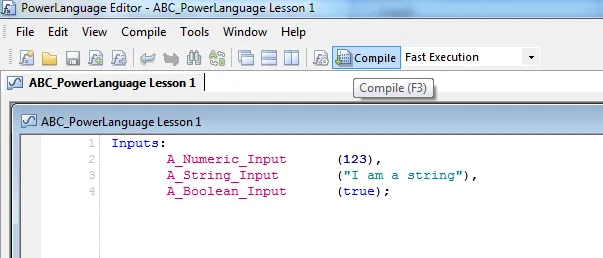
Try it out yourself. Type the three inputs and, when you are done, hit Compile (or F3).
The Build tab in the bottom window will now display something like this:
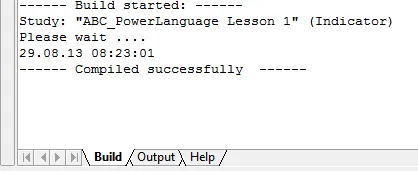
It displays the name of the study and the start and end time for the compilation. The message indicates that you have just successfully compiled your first PowerLanguage indicator for MultiCharts. Congratulations.
If you receive an error message, this means there is something wrong with your code. Compare your code to the code above again and check for differences. This might be something simple like a missing comma or a bracket not closed.
You can use the inputs in the code later, but the value of it can’t change within the code. This is where variables come into play.
Understanding variables
Variables are used to store numerical, string, or logical (true/false) values. The value stored in a variable can be referenced throughout a script by the variable’s name and can be modified by the script at any time. Variables must be declared before use.
Your code can use variables to work with data. They are used to store a value and, as the name suggests, the value can vary. It can be changed (it is variable, hence the name) while your study runs. The value can be numerical, string or logical (true/false).
Just like the inputs, the variables in PowerLanguage can have the same three types:
- a Numeric variable
- a String variable
- a Boolean variable, i.e. a variable storing true/false data
You also set the type by initializing the variable when you assign a default value to it. Additionally, you can specify the update basis (during the bar or at the end of the bar) and the data number for each variable when you declare it. This is something I will cover in detail in a future lesson, so don’t worry about that at the moment.
Let’s add some variables to your code now. Type in the three variables you see below and press Compile (or F3):
Inputs:
    A_Numeric_Input    (123),
    A_String_Input     ("I am a string"),
    A_Boolean_Input    (true);

Variables:
    A_Numeric_Variable    (456),
    A_String_Variable     ("I am a string, too"),
    A_Boolean_Input       (false);
This did not work as expected. What went wrong? Take a look at the Build output tab. It will give you a clue.
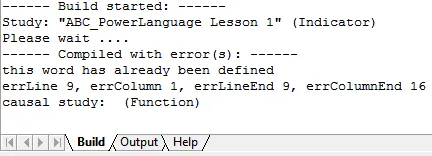
“This word has already been defined”. This refers to the second occurrence of “A_Boolean_Input”. You can only use the same name once to declare a variable or input within each study. PowerLanguage will treat upper and lower cases the same. So “VariableName” is the same as “VARIABLENAME” or “VariaBLENamE” and every other combination. Change the variable name as shown below and it should compile without problems.
Inputs:
    A_Numeric_Input    (123),
    A_String_Input     ("I am a string"),
    A_Boolean_Input    (true);

Variables:
    A_Numeric_Variable    (456),
    A_String_Variable     ("I am a string, too"),
    A_Boolean_Variable    (false);
Naming inputs and variables
While we are on the topic of inputs and variables, let’s go over some things regarding the naming.
Apart from the reserved keywords you are totally free in choosing the name (except that some special characters like %, & or $ are not allowed, too). This means you can name a variable var1 or WeightedAverage. Both could store the exact same value. The latter name, however, gives you an idea about the purpose of the variable already.
You can make your coding life a lot easier when you use meaningful names for inputs and variables. This comes in handy when you are looking through your code to track down a bug, too. When you have a line like this:
Var1 = Var2 + Var3 * (Var4 - Var2);
It’s much harder to see what is intended with this piece of code. This line is in fact the calculation of an exponential average. With good variable names it can be a lot clearer:
ExponentialAverage = Average1BarAgo + WeightingFactor * (PriceValue - Average1BarAgo);
Before we finish the first lesson, let’s go over a couple of things that will also help make your life a lot easier in the long run.
Improve the readability of your code
I find it very helpful to have some structure in the code. This can be accomplished by whitespaces. Horizontal tabs and blank lines after a code block, for example, help when you are working inside the code.
No one is stopping you from writing your whole code within one line. However, code like this is much harder to maintain. The whitespaces will also not hurt your code’s performance. When you compile the code within the PowerLanguage Editor, the compiler will get rid of the whitespaces when creating the machine code¹ that MultiCharts can work with.
Our input and variable part could look like this and the result would be exactly the same. It would just be much harder to read:
Inputs:I1(123),I2("I am a string"),I3


(true);Variables:Var1(456),Var2("I am a string, too"),Var3(false);
Not only have the inputs and variables no meaningful names, but I have also been overly generous with the horizontal tab and blank lines once and, on other instances, have not used them at all.
Commenting your code
I want to conclude the first lesson with comments and my opinion on code commenting. You can add code to your study that will be ignored by the compiler, but can add a lot of help for the programmer to understand the code. Comments won’t change the study’s logic; they are only for you or other programmers.
There are two types of comments:
- a comment that only spans from the start of the comment to the end of the line
- a comment that spans from its start to where you stop it
The first type of comment will start with ”//” and end at the end of the line you start it. The second type of comment will start with an opening brace ”{” and end with a closing brace ”}”.
//This comment spans over this line only. It will end at the end of the line.

{This is a comment that will only end if you set a closing brace for it again.
It can span over several lines.
Like this one}

{Or only a few colums and end within the same line} //Now the code could continue in the same line,
//but instead this is another comment.
These comments are great to add some explanations to your code. With that I don’t mean adding comments to every line to explain what is going on. Write the code in a clear way that it’s able to tell what is done. Add the comments then to explain why something is done.
There are no rules carved in stone for code commenting. In my opinion, everything that helps make the code easier to read and understand is useful. Leave writing novels for the writers and don’t let the comments get too excessive. Sometimes a code piece is very clear and doesn’t need additional commenting. At other times you might need a couple of lines to explain something.
Don’t be afraid of using too many comments, though. Using no comments at all is definitely worse. Having to understand code that is not commented at all and maybe doesn’t use meaningful variable names can be very time consuming. I’d much rather go through code that uses too many comments.
Why bother if you code alone?
Why should I use proper commenting, meaningful names and whitespaces if I am the only one who works with the code?
Even if you only code for yourself, it makes sense to use the coding techniques from above. While you are writing the code everything is usually perfectly clear. You have a good grasp of why you are doing what you are doing. If you have to go back to your code after weeks or months, however, it might not be that clear anymore.
You will save yourself a lot of time in the end if you incorporate some good coding habits right away. This will also help you find bugs and problems easier. As looking for problems is a major part in programming, everything that lowers the time spent with problem finding is good.
That’s it for today’s lesson. I hope it wasn’t too technical, but I felt like laying a foundation is a good starting point. The next session will be more practical for sure.
In this lesson you got to know the PowerLanguage Editor and learned how to compile a study. You should know how to declare and initialize inputs and variables and their three different types. The last part taught you some good coding habits to improve your code readability.
Using whitespaces, meaningful names and comments will make your life easier as they save you a lot of time in the long run.
I am glad if this lesson was helpful for you and I am looking forward to creating Lesson 2.
1: If you like, you can read more about machine code here.