

Learn how to execute code expressions based on conditions
In today’s lesson you will learn how to control your program flow and make it execute parts of your code only when certain conditions are met. This is where if statements are used. You can find them in basically every high-level programming language, and they are the engine that drives each program.
If statements can, for example, be used to color a moving average differently based on its relation to the close of a bar. If you want to close all open positions after a certain time, an if statement will come into play. If you want to trigger an alert when a predefined condition is met, you will use an if statement for that, too. This list could go on for quite some time, but I think you already understand that if statements are not only very useful, but also very important. No programming tutorial could be complete without going over them, and a good understanding is essential before we can move on to more complex things.
if…then…
The “if…then…” statement is the simplest form of a conditional statement. The condition is tested, and if it’s true the following code statement is executed. If the test is false, nothing is done, as the following code statement is not executed.
When I say the test is true, don’t get confused and think you are limited to testing conditions that include “true” only. If “ii” is a numeric variable, and “MyCondition1” and “MyCondition2” are boolean variables, then these are three valid “if…then…” statements.
if MyCondition1 = false then
    Print("MyCondition1: ", MyCondition1);

if MyCondition2 = true then
    Print("MyCondition2: ", MyCondition2);

if ii = 0 then
    Print("ii: ", ii);
In the case of the first statement, the code checks for “MyCondition1 = false”. If “MyCondition1” indeed is false, the test result will in fact be “true” (because the expression to check is matched). This can be a bit confusing at first, but recall that we did similar checks in the last lesson working with the while loop. You can print the result of a test to the PL Editor output bar using the print command.
once
begin
    MyCondition1 = false;

    Print("MyCondition1: ", MyCondition1, "; Test result: ", MyCondition1 = false);

    MyCondition1 = true;

    Print("MyCondition1: ", MyCondition1, "; Test result: ", MyCondition1 = false);
end;
The Output bar then shows:
MyCondition1: FALSE; Test result: TRUE
MyCondition1: TRUE; Test result: FALSE
The code statement following the “if…then…” statement will only be executed when the check condition is matched. If the test returns false, the code continues with the next part. If you want your code to perform one statement when the test condition is true and another when it’s false, you could use two “if…then…” statements, or use another type of statement.
if…then…else…
The “if…then…else…” statement executes one code statement if the check condition is true, and a second statement if the test is false. Going back to our moving average example, we can change the color of the average according to the relation of the closing price to the average. If the close is above the average, then the average should be colored green; if it’s not, it should be red. Note that this means the average would also be colored red in the case where the close matches the average.
Using the “if…then…else” statement and the reserved word “SetPlotColor” will do the trick here. SetPlotColor has two parameters: the first is the number of the plot you want to change the color for (it’s 1 for Plot1, 5 for Plot5, etc.), and the second is the color you want the plot to use.
Inputs:
    Price           (Close),
    AverageLength   (10);

Variables:
    Counter         (0),
    CloseValueSum   (0), //this variable will store the summation of the close values for the bars
    AverageValue    (0);

//reset the variable storing the summation of close values
CloseValueSum = 0;

//sum the close values for the last X bars corresponding
//to our AverageLength input
for Counter = 0 to AverageLength - 1
begin
    CloseValueSum = CloseValueSum + Price[Counter];
end;

//calculate the average; with checking that the AverageLength is not 0 i.e. it's
//smaller and larger than 0 we avoid any issues that an attempt to divide by zero would cause
if AverageLength <> 0 then
    AverageValue = CloseValueSum / AverageLength;

//change the color of the average according to price/average relation
if Close > AverageValue then
    SetPlotColor(1, green)
else
    SetPlotColor(1, red);

//plot the result to the chart
Plot1(AverageValue, "Average");
As planned, the average will now change its color according to the relation of the bar close to the average. As mentioned, the case where the close is equal to the average is also colored red.
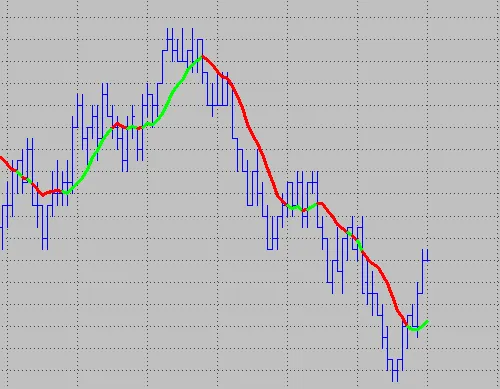
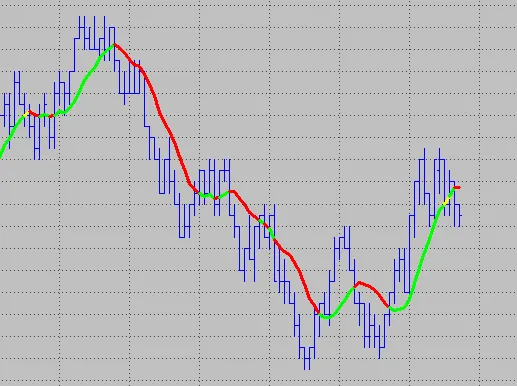
One very useful feature of “if…” statements is that you can combine or nest them to create more complex logic trees. We could slightly alter the “if…then…else” statement used in the code above and add a third color for the case where the close matches the average.
//change the color of the average according to price/average relation
if Close > AverageValue then
    SetPlotColor(1, green)
else
if Close < AverageValue then
    SetPlotColor(1, red)
else
    SetPlotColor(1, yellow);
The code piece groups one “if…then…” and one “if…then…else…” statement to perform the task. Please note that only the last code line in a single “if” or in multiple grouped “if” statements has to be followed by a semicolon.
if…then begin…end
The “if…then” and “if…then…else…” statements are great if you only have one code expression that should be executed. For more complex code blocks you have to use block statements. The “if…then begin…end” block statement is similar to the “if…then” statement, but allows for multiple code expressions between the “begin” and “end”. The “begin” and “end” are common for block statements – this is how they start and end. When comparing them to the regular “if…then…” or “if…then…else” statements, in an “if…then begin…end” block all complete statements within the “begin…end” have to be followed by a semicolon.
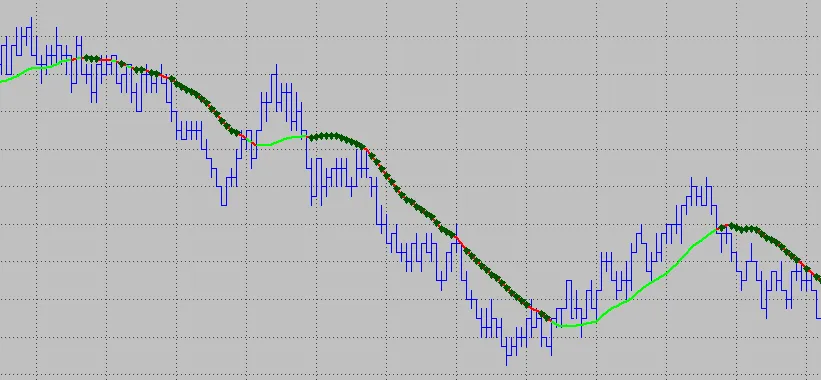
Let’s add a simple block statement to our average that plots a cross (for this you need to change the plot style to cross in the properties) and gives us an alert when the full bar is below the average.
//check if the whole bar is below the average
if High < AverageValue then
begin
    Plot2(AverageValue, "Average");
    Alert("Complete bar below the average");
end;
if…then begin…end else begin…end
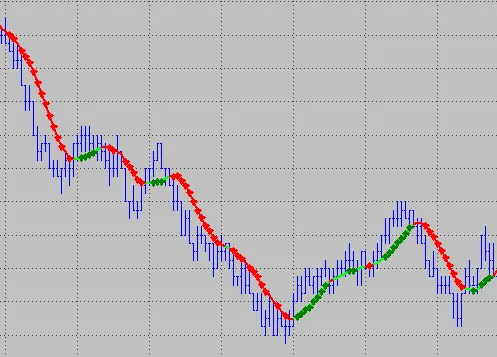
Of course, there is also an “if…then begin…end else begin…end” block statement, for when you want to use more code statements within a conditional branch. With this, and the other “begin…end else…” forms, there is one thing to note: the “end” after the first “begin” is not followed by a semicolon – only the last “end” that completes the statement needs the semicolon. You can also combine two “if…then begin…end” statements together, like this, to highlight the bars that are fully above the average as well:
//check if the whole bar is below the average
if High < AverageValue then
begin
    Plot2(AverageValue, "Average");
    Alert("Complete bar below the average");
end
else
//check if the whole bar is above the average
if Low > AverageValue then
begin
    Plot3(AverageValue, "Average");
    Alert("Complete bar above the average");
end;
once…begin…end
For the remainder of today’s session we have two more statements to go over. We have used one of these a couple of times before, so you are already familiar with it – as you might have guessed, it’s the “once…begin…end” statement. We even used it at the beginning of this session, just without an evaluation condition. The benefit of this statement is that once the boolean expression becomes true for the very first time, it’s never tested again. It is simply skipped in the code after it has been executed once. This is great, for example, for initializing variables and doing calculations that you only have to do once. In general, “once” starts a statement that looks like this:
Once ([optional boolean expression])
[begin]
    Single statement or statement block
[end]
The boolean expression following “once” is optional and can be left out, as you’ll see in the next example. If you only have one statement to be executed once, you can also leave out the “begin” and “end;” reserved words. The code below contains three examples of how “once” could be used:
//clear the Output bar the first time the code is executed
once cleardebug;

//clear the Output bar on the first bar
if CurrentBar = 1 then cleardebug;


once
begin
    OneTick = MinMove / PriceScale; //minimum movement in points
    Decimals = Log(PriceScale) / Log(10); //decimal spaces for the symbol
end;

once (DayOfWeek(Date) = Monday)
begin
    cleardebug;
    Print("This text will be printed on the first Monday on your chart.");
end;
- The first example clears the Output bar and deletes any old print information in there.
- The second code statement does the same, but as the code checks for “if CurrentBar = 1”, this check is performed again with each code execution. With the “once” statement, the code is executed once and then not checked again – which also gives you slightly better performance.
- The third example also shows how to compute the tick movement and decimal places of a symbol and store the results in two variables.
- The last example checks whether the day on the chart is a Monday. Once this is true, the Output print log is cleared and a new text is printed.
switch/case
The “switch/case” statement is the final statement we will look at today. The switch and case statement is useful for managing more complex conditional branching operations. Instead of nesting multiple “if…else” or other statements, multiple case sections can be executed based on the switch expression. This sounds much harder than it really is. Let’s take a look at a simple code example that helps clarify the “switch/case” statement. Create the below indicator and load it onto a chart. Then check different numbers for the input and the print outcome in the Output bar. The print statements are only split across two lines here for better readability; normally I would leave them on one line unless they became too long.
Inputs:
    Number  (1);

//once statement to prevent multiple code executions and a clearer Output log
once
begin
    switch(Number)
    begin
        case = 1:     Print("The Number input of " + NumToStr(Number, 2) + " is matching the "
                      + doublequote + "case = 1" + doublequote + " statement.");
        case 2 to 10: Print("The Number input of " + NumToStr(Number, 2) + " is matching the "
                      + doublequote + "case 2 to 10" + doublequote + " statement.");
        case 2 to 5:  Print("This print statement will never be executed.");
        case > 0:     Print("The Number input of " + NumToStr(Number, 2) + " is matching the "
                      + doublequote + "case > 0" + doublequote + " statement.");

        default: Print("The Number input of " + NumToStr(Number, 2) + " is not matching any case statement.");
    end;
end;
The code passes the “Number” input via the switch statement to the first matching case expression and executes the following statement. If a matching case expression is found, all statements for that expression are executed, and then the code continues after the “switch/case” statement. That’s why the statement for the case 2 to 5 is never executed – that case is already included in 2 to 10. Exchange the positions of the two cases and both could be executed, depending on the Number input. The “default” statement is optional; you can use it to make sure one statement is executed even if no case expression is matched. You can use multiple different statements for each case as well – I just used one print statement for each case in this example.
Plan your logic first
The statements we looked at during this lesson have in common that you can nest and group them for more complex logic. Sometimes you will have to get quite creative to achieve what you have in mind. That’s why a good outline of your logic is so important. Take some time before you start coding – maybe draw a flow chart or a logic tree. This can really save you a lot of time in the end. I know I have stressed this before, and I will say it again because it’s important: learning something new is a lot easier than unlearning a bad habit. If you are starting to learn how to code in EasyLanguage or PowerLanguage, make it your good habit to properly plan your programming before you start.
This concludes the lesson about if statements and conditional branching. It also marks the end of the first basic lessons. With the following lessons we will dive deeper into programming and take a look at new ideas and theories along the way.